TryFi 2 - The Second Try
This morning, I'm hacking on the XbeeWifi again.

I'm still looking for a good solution to prevent static
shock. The Arduino retail box works pretty well.
Looking over cjbearman's github page, the technical details are fierce, but luckily examples are included. After loading several up, I'm starting to see common patterns in the code. There's a couple extra subroutines (modules? functions? O_o) to handle different wifi scanning features. Unlike the Ethernet shield and library, we'll have to manually scan and handle data coming in and out. This could get messy.
Well, let's give it a try. Network Scan sounds like a good example -- it should output a list of available wifi networks, which is almost always an essential feature.

XBee Init Failed? Loop forever - game over, man!
What happened here? Well, the Arduino sent signals over to the Xbee, but the Xbee didn't respond. Why not? Well, this is the (boolean: 1 or 0) result of a process on the Arduino, sent across 4 pins from Arduino to Xbee. Looking at the code, we see this in the line:
bool result = xbee.init(XBEE_SELECT, XBEE_ATN, XBEE_RESET, XBEE_DOUT);
What does this mean,, when translated from C to English? We're going to set Result to either 1 or 0, based on what xbee.init says about the 4 variables between the parentheses. If you want to be a programmer, please don't use all caps for your variable names. So where are these variables declared? At the top of the code:
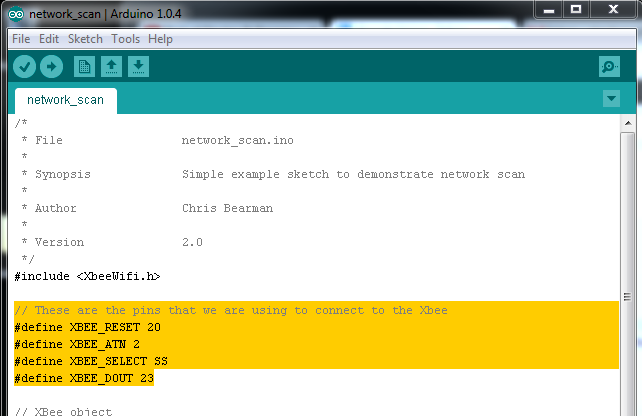
"You're supposed to change these variables to
match your board's connections, you noob!"
Yea, so I forgot to change my pinouts. I'm not even sure which Arduino Uno pins connect to the Xbee. So the Arduino is expecting to use pin 20 for the Xbee Reset feature, and 23 for DOUT....so let's change that.
Xbee Pinouts
So where do we find the correct variables? First, let's start with the Xbee pinout:

This is the same 20-pin Xbee shield which can be seen
in this post's first image -- it's plugged into the Wireless
SD Shield.
We need 4 variables from the Xbee - Select, Atn, Reset, and the D-out. Right away we see pin 5 is Reset and pin 2 is Data Out, now we'll need to see how those get routed through the Wireless SD Shield and into the Arduino. Select and Atn aren't obvious from this, but maybe they'll pop up in the specifications.
SPI
Looking at the scary schematic, the Arduino Wireless SD Shield page, and cjbearman's github, it's really not obvious which pin is actually used for which output. But his github does describe this library using SPI to communicate. Wireless SD Shield takes up pins 11, 12, & 13 for SPI, along with pin 4 for the SD card select. An Introduction to SPI on Xbee has a table which shows 5 pinouts, including the clock pinout. I'm not sure exactly how SPI works, but I feel like I'm close.
Wrapup
I'm slightly satisfied with today's progress. Seeing the code produce a confirmed failure means we're almost certainly on the right track, and it's just a matter of finding the right pins. Once that is done, we can start connecting to networks, exchanging data, and hosting a webpage.
Also, some serendipity - I've accidentally mixed a working Arduino with a damaged one recently, when they were in the same box, and now they both work. Maybe it was just a memory cell that had to discharge. Maybe it was hacker's luck.
No comments:
Post a Comment